How to Create Targeted Local Facebook Ads: A Beginner’s Guide For Service Businesses
Learn how to create your first targeted Facebook ad and optimize it for local search.

What You’ll Learn
- How to set up your first local Facebook ad campaign
- Tips on optimizing a local ad campaign
- Important Facebook ad guidelines to be aware of
With over 2.9 billion active monthly users, Facebook remains the most used social media platform in the world. For service businesses, it’s a goldmine of potential local customers waiting to be targeted. But since it’s such an effective tool for finding and connecting with local businesses, you’ll have to do more than setting up a Facebook page to get in front of your ideal customers.
That’s where targeted local ads come in.
How to Set Up a Targeted Facebook Ad Campaign
1. Access Your Facebook Ads Manager
For this article, I’m going to assume you already have a Page set up for your business. But if you don’t, pause here and follow Facebook’s steps for creating one before you continue.
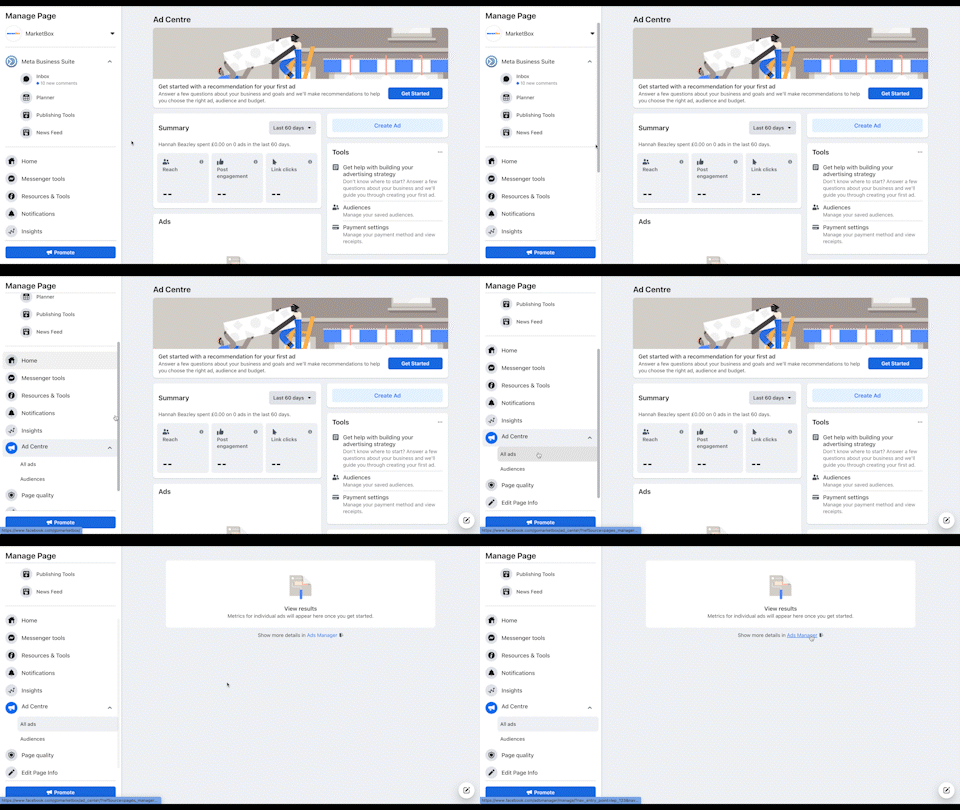
The easiest way to find Facebook Ads Manager for the first time is to head to your business page, navigate to "Ad Centre’"and then "All ads’" in the left-hand menu, and click “Ads Manager.” Once there, bookmark the page to save time in the future! There’s also a "Meta Ads Manager" app for both Apple and Android if you prefer.
2. Create Your First Campaign
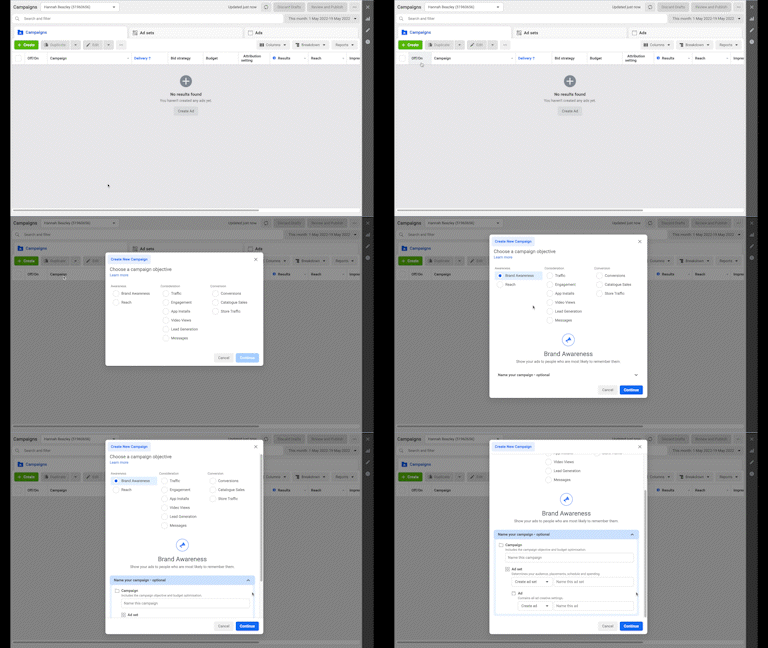
Before you create your first targeted Facebook ad, you’ll need to create an ad campaign. Click the green "Create" button in the top left.
You’ll now be asked to choose an ad campaign objective — in other words, what are you hoping to achieve with this ad. There are rumors of new ones being added, but for now, you can choose from a range of objectives that are grouped into three main categories.
- Awareness (good for generating interest in your service)
- Consideration (good for encouraging people to engage more with your service)
- Conversion (good for pushing people over the finish line and getting them to purchase your service)
Most of the objectives are self-explanatory, but two differences to be aware of are "Brand Awareness" and "Reach" ads.
"Brand Awareness" ads will show your ads to the people who are most likely to remember them, whereas a ‘Reach’ ad is shown to as many people as possible, making it a less targeted option. If your goal is simply to raise awareness for your business, a ‘Brand Awareness’ ad is going to offer the best value for most first-time advertizers (especially if you have a smaller budget).
Once you’ve chosen your objective, you’ll need to name your campaign. It’s best to give it a specific name, rather than something like campaign 1, so you can distinguish between them in the future.
Tip: If you plan to run seasonal campaigns, include the season/holiday/event that they revolve around so you can easily turn them on or off, depending on the time of year.
3. Set Up A/B Testing

A/B testing your ads is a great way to find out the types of ads your target audience responds best to. It involves running two variations of an ad at the same time, which are randomly shown to your chosen audience. By analyzing the data, you can make more informed decisions regarding your campaigns going forward.
This step is entirely optional, but I recommend you use it. Luckily Facebook makes A/B testing easy. All you need to do is turn the option on, and once you’ve published your first ad, you’ll be prompted to edit a duplicate version to test against. Facebook takes care of the rest.
4. Set Your Budget
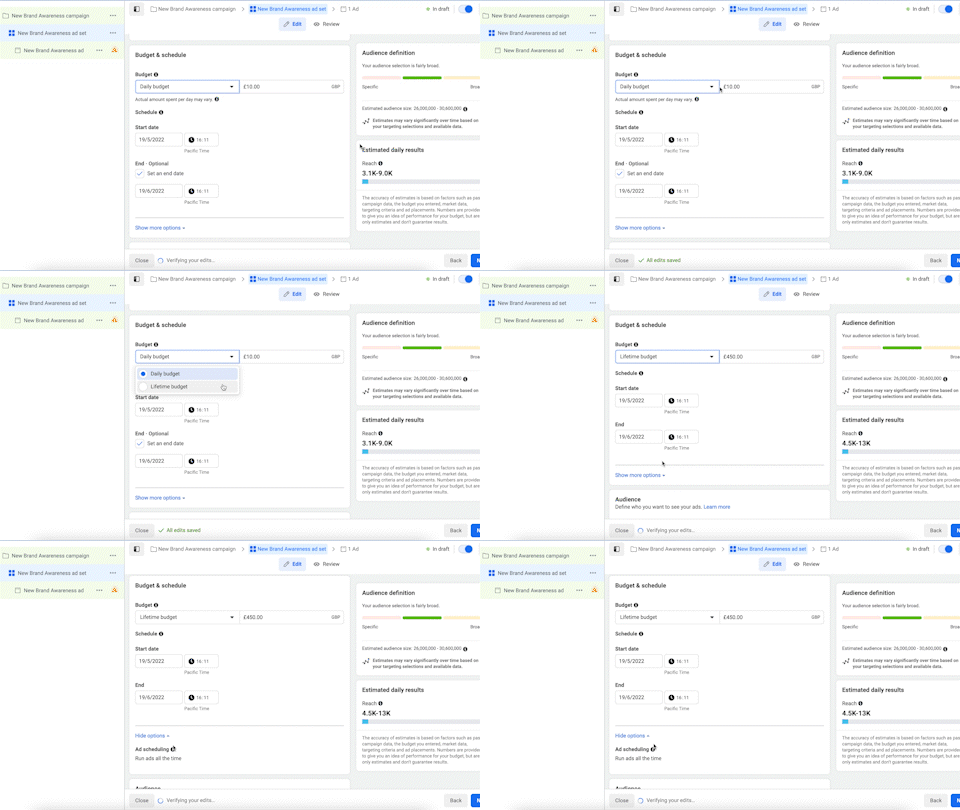
Next up, you’ll have to determine your ad campaign budget. This figure represents the maximum amount you’re prepared to spend, and you have the option of setting a daily or a lifetime cap.
A daily spend is as it sounds — a daily limit on what you spend per day on the ads. If you select this option, Facebook’s algorithm will detect the best time and place to show your ad to your target audience for maximum results. If/when your budget is reached, the ad will pause and begin again tomorrow.
The lifetime budget, on the other hand, is how much you’re willing to spend during the entire length of your campaign. For this option, you’ll need to provide an end date and a $ amount. The campaign will stop once the budget is reached, or the end date passes.
5. Customize Your Target Audience
As a local service business, setting up the right target audience is the most important step when creating targeted Facebook Ads. This step determines who will see your ad. Set it too broad, and you risk wasting money on people outside your service area, or who aren’t looking for your service at all. Set it too narrow, and you’ll miss out on potential customers.

At a high level, you can customize your audience based on
- Location
- Age
- Gender
With detailed targeting, you can narrow down your audience further by things like language, interests, and behaviors. You can even set up rules that let you include/exclude people connected to certain pages, apps, or events.
For retargeting ads, you can also set up custom audiences to include those that have already interacted with your business.
For example, if we were running an ad in the US and didn’t target beyond the default (Age 18 -65+, All genders, All demographics, interests, and behaviors), our estimated audience size would be 226,800,000 - 266,800,000. In other words, a few million more than we need!
However, if we went in and narrowed it down by just one behavior - small business owners - we can bring down the audience for our ads to between 4.3 - 5.3 million with a reach of 2.6-7.5 thousand daily. There’s still plenty of opportunities to optimize further but you can see the impact (and cost saving) of even one additional filter.
6. Choose Your Ad Placement
Once you’ve set your ad campaign budget and determined your target audience, you’ll need to select where your ad is going to be displayed. The easiest option to choose is the Automatic placement, which automatically places your ads in the locations that will perform best for your objectives and maximize your budget. Alternatively, you can opt for manual placements and hand select where to display the ad, but for first-time advertizers, I recommend you let Facebook do the hard work!

If you select “More Options” underneath the Automatic and Manual placement buttons, you’ll see a list of additional settings you can configure. The main one to be aware of is the "Block lists". This option lets you create a list of locations where you don’t want your ad to be displayed to protect your brand’s reputation. You can learn more about Block Lists and their uses here.
7. Create Your Ad
Finally, it’s time to create your ad! You can repurpose existing posts on your page, or you can start from scratch and upload the photos or videos you’d like to use.
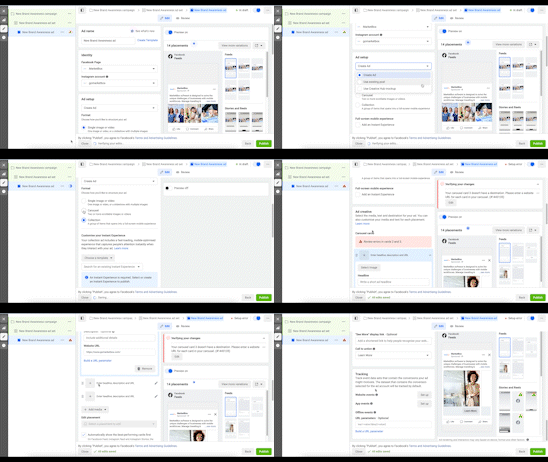
You may find that Facebook has made some recommendations for you. Either way, it walks you through the different placements for text, media, URLs, etc, so you can create the perfect ad for your business.
Here are a few things to be aware of:
- If you add a URL to your ad, users will be directed to that location (usually your website). If you don’t, users will be sent to your business’s Facebook page by default.
- Headlines should be short, to the point, and attention grabbing
- When A/B testing, a good variation to trial is image vs video, or single image vs carousel ads
- Check the frequency of your Facebook ad — the easiest way to turn your audience off your product/service is to spam them
8. Publish
Once you’re happy, hit publish!
Your ad will need to be reviewed by Facebook to make sure it doesn’t violate their community guidelines and that the images etc fit their specs. This can take up to 24 hours, and you’ll receive a confirmation email when the ad is live.
Once your ad is live, you can monitor the results via your Ads Manager page. It’s good practice to regularly review the reports and make any necessary changes to the ad to ensure you’re getting the best results and value from it.
Facebook Ad Specs To Be Aware Of
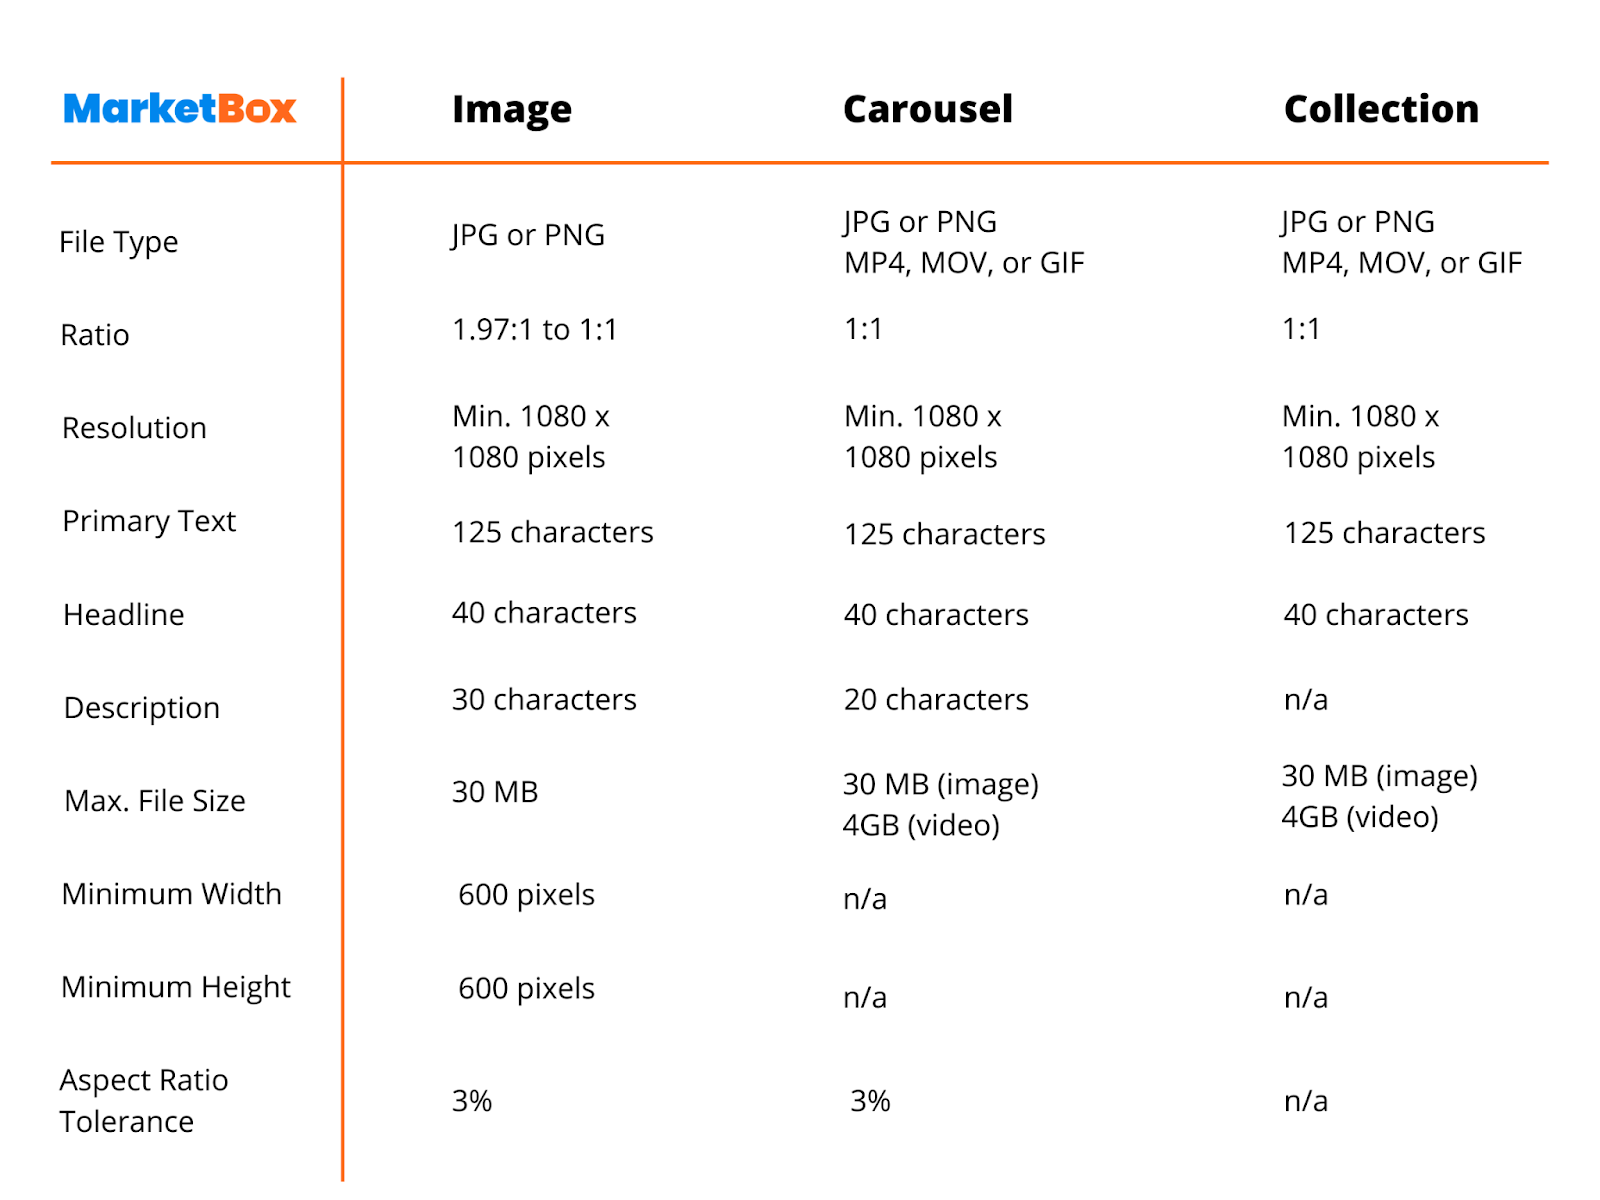
Above are the Facebook Ad specs to keep in mind when creating graphics for your ads. If you’d like to download a pdf version to refer back to, click here.
Ready to transform your scheduling?
Talk to our sales team and see how MarketBox can help you achieve more with less effort


.svg)
